| Welcome to the Bartels Group of Companies |
|
 |
|
|
|
4.7.1 Starting the CAM ProcessorBefore starting the CAM Processor for generating real project manufacturing data, you should always perform a complete design rule check using the function from the Layout Editor menu. Subsequently the DRC result should be examined with the function. It is strongly recommended to refrain from generating and/or releasing any CAM Processor output if clearance violations, short circuits or open connections are indicated since this will (almost certainly) result in the production of faulty PCBs. It is recommended to start the Bartels AutoEngineer from in the directory where the design files should be generated since this considerably simplifies job file access. If you intend to process the examples provided with this manual it is recommended to move to the BAE examples directory installed with the BAE software. The Layout Editor can be called from the Bartels AutoEngineer main shell. Start the BAE shell by typing the following command to the operating system prompt: > bae Move the menu cursor to the Layout menu item and confirm this choice by pressing the left mouse button:
Now the Layout Editor program module is loaded and the Layout Editor menu is activated. If this fails to happen then check your BAE software installation (see the Bartels AutoEngineer® Installation Guide for details on how to perform a correct installation). Use the command from the Layout Editor menu to call the CAM Processor:
If a layout element was previously processed in the
Layout Editor, then this element will automatically be saved and re-loaded to the
CAM Processor. Within the
CAM Processor the
function from the
menu is used to load layout elements of any hierarchy level. Use the following commands to load the layout named
The system issues the
error message, if the font used in the loaded element is not available in the
Without character font data, the CAM Processor fails to plot any text defined on the currently loaded layout element. You should either supply the requested character font (e.g., use the fontconv utility program) or assign an existing font to the layout element using the function from the Layout Editor menu before producing any CAM output. 4.7.2 CAM Processor Main MenuThe CAM Processor standard/sidemenu user interface provides a menu area on the right side, consisting of the main menu on top and the currently active menu below that main menu. After entering the CAM Processor the menu is active and the menu cursor points to the function. The Windows and Motif versions of the
CAM Processor can optionally be operated with a pull-down menu user interface providing a horizontally arranged main menu bar on top. The
The following main menu is always available whilst processing layout data with the CAM Processor:
DisplayThe or menu can either be activated by selecting the corresponding main menu item or by pressing the middle mouse button. The or menu provides useful functions for changing display options such as zoom window, zoom scale, input grid, color settings, etc. Control PlotThe menu provides the functions for generating HP-GL pen plots, PCL HP-laser prints and Postscript output. Gerber PhotoplotThe menu provides the functions for generating Gerber photo plots, also including facilities for defining and managing Gerber aperture tables. Drilling+InsertionThe menu provides the functions for generating drill data output (format Sieb&Meier and/or Excellon ) and insertion data output (generic format). Plot ParametersThe menu is used to set general plot parameters (plot tolerance, CAM origin, CAM rotation, CAM mirror mode) and to define special parameters for generating negative power layer plots. The menu also provides features for controlling the processing of special layers such as the , , and layers. UtilitiesThe menu provides functions for exiting BAE, returning to the BAE main shell, calling the Layout Editor and starting User Language programs. The menu can also be used for loading layout elements, listing DDB file contents, setting the display grid and the coordinate display mode, or removing error markers. 4.7.3 Customized CAM Processor User InterfaceMenu Assignments and Key BindingsThe BAE software comes with User Language programs for activating a modified CAM Processor user interface with many additional functions (startups, toolbars, menu assignments, key bindings, etc.). The bae_st User Language program is automatically started when entering the CAM Processor. bae_st calls the uifsetup User Language program which activates predefined CAM Processor menu assignments and key bindings. Menu assignments and key bindings can be changed by modifiying and re-compiling the uifsetup source code. The hlpkeys User Language program is used to list the current key bindings. With the predefined menu assignments of uifsetup activated, hlpkeys can be called from the function of the menu. Menu assignments and key bindings can be listed with the uifdump User Language program. The uifreset User Language program can be used to reset all currently defined menu assignments and key bindings. uifsetup, uifdump and uifreset can also be called from the menu of the keyprog User Language program which provides additional facilities for online key programming and User Language program help info management. Cascading Windows/Motif Pulldown MenusThe Windows and Motif pulldown menu user interfaces of the CAM Processor provide facilities for cascading submenu definitions. I.e., submenus can be attached to other menu items. The uifsetup User Language program configures cascading submenus for the pulldown menu interfaces of the Windows/Motif CAM Processor modules. This allows for easy submenu function location (and activation) without having to activate (and probably cancel) submenus. The function repeat facility provided through the right mouse button supports cascading menus to simplify repeated submenu function calls. Windows/Motif Parameter Setup DialogsThe following Windows/Motif parameter setup dialogs are implemented for the CAM Processor:
The uifsetup User Language program replaces the parameter setup functions of the Windows and Motif pulldown menus with the above menu functions for activating the corresponding parameter setup dialogs. Windows/Motif Pulldown Menu KonfigurationWhen using pulldown menus under Windows and Motif, the uifsetup User Language program configures the following modified CAM Processor main menu with a series of additional functions and features:
4.7.4 In-built CAM Processor System FeaturesAutomatic Parameter BackupThe CAM Processor provides an in-built feature for automatically saving important operational and plot parameters with the currently processed layout and/or part symbol. The following parameters are stored to the current design file when changing to the BAE main menu or to the Layout Editor (i.e., CAM parameter backup can only be suppressed when exiting BAE):
Parameter sets are stored with special names according to the currently processed layout database hierarchy level. The layout element name is used for layout elements, parameter set name
Output DeviceThe
functions from the
and
menus are used to specify the CAM data output device. The output can either be written to a file, or directly to the plotter and/or printer. When plotting to a file, the desired output file name must be specified. When writing directly to the plotter, the name of the output port where the plotter is connected (e.g.,
Error creating file!
Error writing ASCII file!
The
CAM Processor will prompt for the output device name after activating the desired output function, if no default plot device has been been specified with the
function. Popup menus for fast output file selection are integrated to the
,
,
,
,
,
,
,
,
,
and
functions of the
,
and
menus. Files ending on
User LanguageThe Bartels User Language Interpreter is integrated to the CAM Processor, i.e., User Language programs can be called from the CAM Processor, and it is possible to implement any user-specific CAM Processor function required such as status display, parameter setup, reports and test functions, special CAD/CAM output and plot functions, customer-specific batch procedures, etc. The
CAM Processor provides both explicit and implicit
User Language program call facilities.
User Language programs can be started with explicit program name specification using the
function from the
menu (empty string or question-mark
( User Language programs can also be called by simply pressing special keys of the keyboard. This method of implicit User Language program call is supported at any time unless another interactive keyboard input request is currently pending. The name of the User Language program to be called is automatically derived from the pressed key, i.e. pressing a standard and/or function key triggers the activation of a User Language program with a corresponding name such as cam_1 for digit key 1, cam_r for standard key r, cam_# for standard key #, cam_f1 for function key F1, cam_f2 for function key F2, etc. The CAM Processor User Language Interpreter environment also features event-driven User Language program calls, where User Language programs with predefined names are automatically started at certain events and/or operations such as cam_st at CAM Processor module startup, cam_load after loading a design element, cam_save before saving a design element, cam_tool at the selection of a toolbar item and cam_zoom at the change of the zoom factor. The module startup User Language program call method is most useful for automatic system parameter setup as well as for key programming and menu assignments. The element save and load program call methods can be used to save and restore element-specific parameters such as the zoom area, color setup, etc. The toolbar selection event must be used to start User Language programs which are linked to toolbar elements. The zoom event can be used to apply an update request to a design view management feature. Bartels User Language also provides system functions for performing key programming, changing menu assignments and defining toolbars. These powerful features can be applied for user interface modifications. Please note that a large number of additional functions included with the CAM Processor menu are implemented through the User Language programs delivered with the BAE software. See the Bartels User Language Programmer's Guide for a detailed description of the Bartels User Language (chapter 4.2 lists all User Language programs provided with the BAE software). Neural Rule SystemA series of advanced Bartels AutoEngineer features are implemented through the integrated Neural Rule System. See chapter 6.3.2 for the rule system applications provided with the Bartels AutoEngineer. Some of these applications allow for special manufacturing data outputs and for extended control over manufacturing data generation processes. 4.7.5 Plot ParametersThe CAM Processor supports a series of general parameters for controlling the CAM output such as plot tolerance, CAM rotation, CAM mirror mode, etc. These parameters can be changed using the functions provided with the menu. It is strongly recommended to set appropriate plot parameters before generating CAM output. Each input prompt at the specification of plot parameters includes a parentheses-enclosed display of the current parameter value setting. On invalid parameter input values the CAM Processor issues an error message such as , and the current parameter value is left unchanged. Plot Parameter Save/LoadCAM plot parameter settings are automatically stored with the currently processed design file when switching to another BAE module (see above, chapter 4.7.4). The CAM Processor menu also provides the and functions. can be used to save the current CAM plot parameter settings to a different DDB file. can be used to load CAM parameter settings from a selectable DDB file. Plot/CAM OriginThe function is used to set the origin of the output coordinate system. When loading a layout element the CAM origin is automatically set to the lower left corner of that element. When selecting the plot rotate or the plot mirror option (see below), then the CAM origin is automatically moved from the lower left to the upper left corner of the currently loaded element (or vice versa). The function can be used to set the CAM origin to an arbitrary point inside the element boundaries. It is always possible to avoid negative output coordinates which certain output devices might not be able to understand and/or process. The plot parameter dialog of the CAM Processor Windows and Motif versions provides a button for resetting the CAM origin to its default position. Plot/CAM RotateThe function provides the options and . The option sets the 0 degree plot rotation (which is the default). The option produces a 90 degree counter-clockwise rotated plot output. Negative output coordinates might be produced when rotating plots. Some printers or plotters refuse to process negative coordinates. The option automatically moves the CAM origin from the lower left to the upper left corner of the element (or vice versa), thus ensuring positive output coordinates only. However, does not change arbitrary CAM origin settings, i.e., positive output coordinates must then be enforced by replacing the CAM origin manually (see above). To indicate CAM rotation mode settings, a mirror mode specific example text and an arrow are placed at the CAM origin marker if CAM mirroring and/or rotation is selected. Plot/CAM MirrorThe function provides options for mirroring the CAM output:
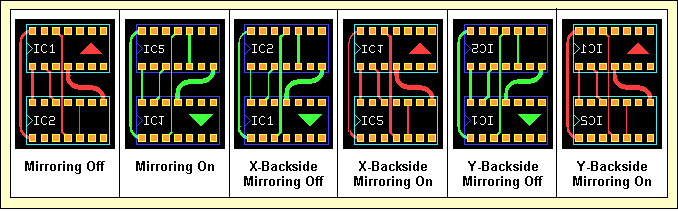
produces output as displayed on the screen. produces output mirrored at the X-axis crossing the CAM origin. mirrors all coordinates at the X-axis crossing the CAM origin, except for the texts which are plotted unmirrored. performs X-axis text mirroring only. mirrors all coordinates at the X-axis crossing the CAM origin, and additionally performs Y-axis text mirroring. performs Y-axis text mirroring only. Figure 4-10 illustrates the effects of the different mirror options.
Figure 4-10: CAM Mirror Modes With all mirror modes, the position of the CAM origin must be considered. With mirroring activated, the CAM origin should be set to the upper left corner of the layout element to ensure positive coordinates output. With the CAM origin set to default, automatically replaces the CAM origin to produce positive output coordinates only. To indicate CAM mirror mode settings, a mirror mode specific example text and an arrow are placed at the CAM origin marker if CAM mirroring and/or rotation is selected. All Layers ModeThe function is used to designate how objects should be treated, which are placed on signal layers and or on both sides of documentary layers. With documentary layers, the refers to side 1 and side 2 and corresponds with the options of the documentary layer menus. With signal layers, the refers to the and signal layer selections. With option , all layer objects are only plotted when selecting the corresponding plot layer (, or with documentary layers). With option , all layer objects are plotted together with the selected plot layer. I.e., when plotting signal layer 1 with the objects on signal layer are also plotted, when plotting of documentary layer the objects on - are also plotted, etc. On default, the option is used. The plot parameter of the BAE HighEnd CAM Processor also provides the , and options. These modes restrict the output of inside layer pin and/or via pads to only those pads which have connections to other elements on the selected inside layer. plots only connected inside layer pin and via pads. plots all inside layer pin pads and only connected inside layer via pads. plots all inside layer via pads and only connected inside layer pin pads. Inside layers are all signal layers except for layer 1 and the signal layer selected with the function. Symbol ToleranceThe function is used to set the plot accuracy for filling areas and/or creating structures using the available set of tools. It allows to plot elements to be smaller by the specified plot tolerance value if this creates more efficient output. E.g., when photoplotting a round pad with 0.062 inch diameter and the plot tolerance set less than 0.002 inch, then the 0.060 inch aperture is used to draw in a circle to produce the correct size; if the tolerance is set greater than 0.002 inch then the 0.060 inch aperture is flashed, since it is smaller than the required size but within the tolerance and much more efficient. The plot tolerance is only calculated to the inside of the structures to be plotted since, otherwise, short-circuits might be produced. The default plot tolerance value is 0.15mm. For structures which cannot be plotted correctly using the smallest aperture and/or pen width, the CAM Processor uses the smallest available tool to generate that structure. Such structures produce overdraw plot errors which are reported and/or indicated with highlight. It is strongly recommended to refrain from passing CAM output with overdraw errors to the PCB manufacturer since this could produce PCBs containing short-circuits. The function from the menu can be used to reset the overdraw error display. Board Outline and Plot MarkersThe
and
functions are used to designate whether the board outline and/or the plot markers should be plotted together with other layers. With the
option of the
function the board outline can be plotted only when selecting the
plot layer. With the
option, the board outline is plotted together with any other plot layer. With the
option of the
function, the plot markers can be plotted only when selecting the corresponding plot markers documentary layer. With the
option, the plot markers are plotted together with any other plot layer. The plot markers documentary layer can be defined with the
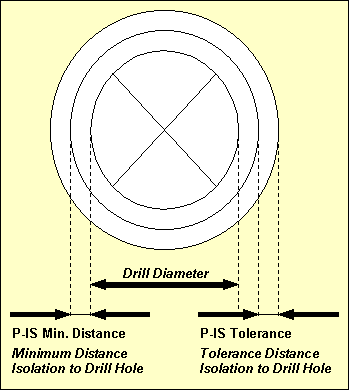
4.7.6 Power LayersWhen plotting power layers, the CAM Processor automatically generates negative plots using special power layer plot parameters. Text placed on power layers is plotted using the standard line width or the selected pen width. When editing power layers, the Layout Editor obviously does not know about the power plot parameters which will later be set in the CAM Processor. I.e., the Layout Editor's DRC cannot perform complete electric checking on power layer plot data generated in the future. It is strongly recommend to perform extensive visual checks on power layer plots before passing such plot data to the film and/or PCB manufacturer (use the CAM View module). Connectivity-changing isolations might be produced, if the power plot isolation width parameters are set too large. Power Layer BorderThe function from the menu is used to define the PCB power layer border width, i.e., the copper-free PCB boundary area to be generated when plotting power layers. The default value for the power layer border width is 2.1mm. If the PCB board outline contains arc-shaped segments, then an appropriate tool (aperture, standard line width or pen) for drawing the board outline with the specified power layer border width is required. Split Power Planes and Power Plane IsolationBoth active and passive power planes placed on power layers are generated by plotting the power plane outline which then is the isolation line of the power plane. Processing active power planes with specific net assignment generates split power planes, whilst passive power planes without net assignment result in isolated areas on the power layer. The width of the power plane isolation can be adjusted with the function from the Plot Parameters menu. The default power plane isolation width is 0.3mm. Power Layer Pin IsolationPins not connected to the power layer and/or the power plane net are isolated by placing filled circles at the corresponding pin drill holes. The isolation circle diameters are calculated from the drill hole diameters and the plot parameters to be set with the and functions from the menu. The function is used to specify the minimum distance between the edge of the drill hole and the outside of the isolation circle placed in the power layer. The default value for the power layer isolation minimum distance is 0.4mm. The function is used to specify the outward tolerance of the isolation area. The default value for the power layer isolation is 0.5mm. The minimum isolation circle diameter is calculated as in Drill Diameter + 2 × (P-IS Min. Distance) The maximum isolation circle diameter is calculated as in Drill Diameter + 2 × (P-IS Min. Distance) + 2 × (P-IS Tolerance) Figure 4-11 illustrates the effects of the minimum isolation distance and the isolation tolerance power plot parameter settings.
Figure 4-11: CAM Power Layer Isolation Heat TrapsPin connections into power layers or to power planes placed on power layers are automatically generated with heat trap construction. A heat trap is constructed with four 45 degree isolation circle segments placed round the drill hole of the pin, thus preventing from too much heat flow. The heat trap circle diameters are calculated from the drill hole diameters and the plot parameters to be set with the and functions from the menu. The function is used to specify the minimum distance between the edge of the drill hole and the outside of the heat trap circle. The default value for the heat trap minimum distance is 0.4mm. The function is used to specify the outward tolerance of the heat trap. The default value for the heat trap tolerance is 0.5mm. The heat trap circle diameters are calculated analogously to the isolation circles (see above). With Gerber photoplot, the CAM Processor checks if there is a thermal aperture available with a diameter matching the calculated tolerance range, which can be used to flash the heat trap. Otherwise, the heat trap is drawn using the smallest round aperture valid for line strokes. Use the following commands to set the power layer border width to 0.3mm, the power plane isolation width to 0.25mm, the minimum pin isolation width to 0.35mm with a tolerance of 0.4mm (i.e., maximum pin isolation width 0.75mm) and the heat trap distance to 0.35mm with 0.45 tolerance (i.e. maximum heat trap distance 0.8mm):
4.7.7 HP-GL OutputThe function from the menu is used to produce pen plots in HP-GL (Hewlett-Packard Graphics Language) format. The function is used to define the pen width for generating HP-GL output data. Structures smaller than the plotter pen width cannot be drawn without overdraw errors. The default plotter pen width is 0.3mm. Pen width value specifications can range from 0.01mm to 10.0mm. The
function is used to control the pen plotter speed, i.e., the speed at which the pen can be moved by the HP-GL plotter. The system accepts either
The HP-GL coordinates are written in plotter units where 40.2 plotter units are 1 millimeter. Some HP-GL "compatible" plotters are based on 40 plotter units per millimeter. The function can be used to specify a scale factor for producing true to scale output with non-default plotter units. The default plot scale value is 1.0 for true to scale output. Plot scale specifications can range from 0.1 to 100.0. The function provides the options and . causes the system to refrain from filling the plot structures, i.e., only outlines are drawn for filled areas. Switching off the fill mode is most useful for fast control plots. is used to select the default fill mode. The function is used to produce HP-GL pen plots. The user is prompted for the plot layer and the pen number (1..99), and for the name of the output file (if no default output device was specified with ). Note the option provided with the layer selection menu of the function. This option can be used for writing the plot data of multiple selectable layers to a single output file. With the option a popup menu is provided for selecting and/or deselecting the plot data output layers using the right mouse button. Layer selections with the left mouse button also allow for layer-specific pen number selections (on default pen 1 is used for each layer). The button is used to select all currently visible layers for output, with the pen numbers automatically set to modulo eight of the corresponding layer colors. Use the following commands to set the plotter pen width to 0.2mm, set the plotter speed to 10cm/s, switch off the fill mode and plot the documentary layer
-
of the currently loaded layout to an HP-GL plot file named
After successfully generating the HP-GL plot file, the CAM Processor issues a message where is the number of overdraw errors. Overdraw errors are highlighted on the layout. A
4.7.8 HP Laser OutputThe
function is used to produce HP Laser plots in PCL (Printer Command Language) format. HP Laser plots are automatically scaled to A4 paper size, i.e., neither plot scaling factor nor pen width settings have effect. Use the following commands to generate an HP Laser plot for documentary layer
-
of the currently loaded layout, and direct the output to
Note the menu item provided with the layer selection menu of the function. This option can be used for writing the plot data of multiple selectable layers to a single output file. With the option a popup menu is provided for selecting and/or deselecting the plot data output layers using the left or right mouse button. The button is used to select all currently visible layers for output. The CAM Processor issues a message after successfully generating the PCL plot. The scale information in the status message indicates any non-default scaling factor being used for automatic plot to sheet size scaling. Binary copy mode is required for transferring PCL plot data to the desired output device. I.e., the
> copy pclplot lpt1 /b with
4.7.9 Postscript OutputThe
function from the
menu is used to produce output in Postscript format. Use the following commands to generate a Postscript output file named
Note the option provided with the layer selection menu of the function. This option can be used for writing the plot data of multiple selectable layers to a single output file. With the option a popup menu is provided for selecting and/or deselecting the plot data output layers using the left or right mouse button. The button is used to select all currently visible layers for output. The CAM Processor issues a message after successfully generating the Postscript output. 4.7.10 Windows Generic OutputA generic print/plot output function is implemented with the Windows versions of the BAE PC software. I.e., any print/plot output feature supported by the current Windows operating system configuration is also supported with the CAM Processor of the BAE Windows software. Use the following commands to activate the Windows print/plot menu:
Note the option provided with the layer selection menu of the function. This option can be used for writing the plot data of multiple selectable layers to a single output file. With the option, a popup menu is provided for selecting and/or deselecting the plot data output layers using the right mouse button. Layer selections with the left mouse button also allow for layer-specific color selections for color plots by assigning pen numbers which correspond with indices to the current color table. The button is used to select all currently visible layers for output, with the color table indices automatically set to modulo-8 layer color numbers. The Windows printer dialog specifications for the number of copies, page sorting mode and page range are considered by the function. The option from the Windows printer dialog of the function plots all elements of the currently loaded database class. This allows for the output of, e.g., all layouts of a project. All layouts are plotted according to layout-specific plot parameter settings such as plot rotation modes. The option from the Windows printer dialog allows for the selection of the print area for generic outputs. The generic output is automatically scaled to the print page format selected through the Windows printer setup if the size of the element to be plotted exceeds the paper size. The page aspect ratio is maintained when automatic plot scaling is applied. The status message of the function provides information to indicate any non-default scaling factor being used for automatic plot to sheet size scaling. 4.7.11 Bitmap Plot Output to Windows ClipboardThe function from the menu can be used under Windows for plotting a bitmap of the currently loaded element into the clipboard ready to be imported (e.g., with ) to other Windows applications capable of processing bitmaps. The whole element is plotted on default. The option can be used to restrict the output to a mouse-selectable rectangle. The plot dialog box also allows for bitmap size specifications and plot rotation mirror mode selections. A black on white plot is generated for single output layer selections. With plot output, the selected layers are plotted with their currently assigned colors (and mixed color display) on black background. 4.7.12 Gerber PhotoplotAperture tables are required for Gerber photoplot outputs. The
menu of the
CAM Processor provides functions for the definition and administration of Gerber aperture tables. Aperture tables are stored to the
Gerber Construction TechniquesIt is important to make the Gerber aperture tables as efficient as possible to minimize the Gerber photoplot data. The reason for this is that an unnecessarily large Gerber file takes up more media space, takes longer to transfer by modem, and takes longer to copy. If the plot is produced by a vector plotter it will also take longer to produce, and cost more. To make the Gerber data more efficient it is important to take into consideration the way the photoplotter plots pads and tracking. The photoplotter has two drawing modes, called line draw and flash. A flash is one single flash of light of a size specified with the aperture, which produces an image of the same size on the plot film. For areas that match apertures, a flash code containing only one set of output coordinates is used. For areas that don't match apertures efficient drawing techniques are used where possible, generating few coordinates but with some shapes and sizes more coordinates are needed. With careful design of pads and appropriate Gerber apertures selected very much smaller Gerber data files can be generated making them quicker to copy, cheaper to send by modem, and require less media space. For orthogonally placed square and rectangular pads that have a matching aperture a flash is used. For rectangular pads that have sides along the X and Y axis and the smaller side matching a square aperture, that aperture is used to draw the pad. For rectangular pads (and square pads that don't have an aperture that matches) that have sides along the X and Y axis and a square aperture exists that is bigger than half the shortest side, that aperture is used to draw the pad with two strokes. For rectangular pads that don't have their sides along the X and Y axis, area fill techniques are used. For round pads that have an aperture that matches a flash is used. For round pads where no aperture matches, area fill techniques are used where line fill will use the nearest smaller aperture to draw the pad by moving in a circular path. Finger pads (rectangles with semi-circles at two opposite sides) are plotted like trace segments, i.e., line draws with matching circular apertures are applied on finger pads. Area fill techniques are applied for pads which don't meet the above specification. A draw is used for trace widths matching a round aperture. For trace widths that don't match an aperture, overlapping lines are drawn using the next smallest round aperture. Irregularly shaped areas are always generated using fill techniques. Gerber Aperture TableThe , and functions from the menu are used to load, save and delete Gerber aperture tables. The function provides a list of all of the available Gerber aperture tables. The function issues an error message such as Gerber aperture table overflow! when trying to load aperture tables containing more than 900 apertures. Such errors indicate a corrupt
Table 4-4: Gerber Aperture Table "standard"
The
function is used to edit entries in the currently loaded aperture table. After activating the
function, the system provides a listing of the currently loaded aperture table where
+ and
- keys can be used to scroll forward and/or backward in this list, and the return key
Note that square-shaped and rectangular aperture can be used for flashing orthogonal placed pads only. It is also strongly recommended to check whether the PCB manufacturer supports rectangular apertures. Use the following commands to define a round line aperture with 0.3mm diameter and D-Code 10 at aperture table index 1:
An empty string input (i.e., pressing the return key
Gerber Format, Optimized Gerber OutputThe function is used to specify the Gerber output format. The option produces 1/1000 inch integer coordinates. The option produces 1/10000 inch integer coordinates. is selected on default. The and options are provided for optionally generating optimized Gerber output with redundant D01 ("light off") plotter control commands eliminated, thus significantly reducing the amount of Gerber output plot data. However, it is strongly recommended to check whether the PCB manufacturer supports optimized Gerber format. Standard Line WidthThe function is used to define the standard line width for Gerber output. The standard line width is used for drawing graphic lines and texts. A round aperture for line drawing is required for the standard line width; otherwise the CAM Processor issues an error message such as Cannot realize the default line width! when trying to generate Gerber photoplots. The standard line width is set to 0.3mm on default. Gerber Fill ModeThe function is used to select the technique for filling irregularly shaped areas (i.e., those areas not matching any aperture for flash or line stroke). Option is used to select the single-aperture line fill technique which uses the smallest line aperture for filling irregularly shaped areas with line strokes. Option selects the multi-aperture fill technique, which is the default. The algorithm used by the multi-aperture fill technique fills areas from the area outline using the smallest aperture and proceeds using larger apertures when moving to the inner of the area. This results in distinct reduction of Gerber data output when using appropriate Gerber aperture tables for layouts with many irregularly shaped areas. With the mode option activated, non-flashable structures are stored with their outline contour, and will be filled by the photo plotter. This feature significantly reduces the amount of Gerber plot data and also eliminates plot overdraw errors. However, it is strongly recommended to check with the PCB manufacturer whether the photo plotter is capable of processing G36/G37 Gerber data. Gerber Arc ModeThe function is used to enable Gerber I/J arc commands (option ) instead of applying arc interpolation (default option ). Gerber arc commands should always be used if the photo plotter is capable of interpreting these commands since this feature results in considerably reduced amounts of Gerber output data. Extended GerberThe function can be used for optionally generating RS-274-X format Gerber output (Extended Gerber with Embedded Apertures). provides the options , and . is the default mode for generating standard Gerber data without embedded apertures. With Extended Gerber mode selected, the Gerber aperture table and the Gerber format selection are included (i.e., embedded) with the Gerber output plot file. The Gerber aperture table to be used and/or embedded can either be the currently active aperture table (option ) or a dynamically (i.e., automatically) generated aperture table (option ). Note that the dynamic aperture table is generated for the whole layout data rather than for the currently plotted layer only. With Extended Gerber the aperture table is automatically transferred to the PCB manufacturer as an integral part of the plot file, and no extra aperture table information file must be generated and/or transferred. With the option, there is also no need for defining and/or activating an aperture table before starting the Gerber plot output. WarningIt is strongly recommended to check whether the PCB manufacturer supports Extended Gerber format before applying this feature. It is also recommended to refrain from using the option with multi-aperture fill mode activated since automatically generated aperture tables usually are not appropriate for multi-aperture filling. Gerber Photoplot OutputThe function is used to start Gerber photoplot output for a selectable plot layer. Note the option provided with the layer selection menu of the function. This option can be used for writing the photoplot data of multiple selectable layers to a single output file. With the option a popup menu is provided for selecting and/or deselecting the plot data output layers using the left or right mouse button. The button is used to select all currently visible layers for output. Use the following commands to generate a Gerber photoplot output file named
The following report is issued by the function after successfully generating the Gerber plot file: Number of Flash Structures .............: <f> Number of Rectangle Drawn Areas ........: <r> Number of Circle Drawn Areas ...........: <c> Number of Multi Aperture Areas .........: <m> Number of Line Filled Areas ............: <l> Number of Heat Traps ...................: <w> Number of Overdraw Errors ..............: <e>
It is strongly recommended to refrain from passing Gerber photoplot output with overdraw errors to the PCB manufacturer since there might be PCBs produced containing short-circuits. The CAM View module of the Bartels AutoEngineer can be used to perform visual checks and panelization on the generated Gerber data (see chapter 4.8 for a description of the CAM View module). 4.7.13 Drill DataThe menu provides functions for generating drilling data output in Excellon II and/or Sieb&Meier format. The CAM View module can be used to perform visual checks, coordinates sorting and panelization on the generated drilling data (see chapter 4.8 for more details). ExcellonThe function from the menu is used for generating drilling data in Excellon II format. With Excellon II format, both the drilling data and the drilling tool table are stored to a single output file. The function can be used to specify a default name for the Excellon output file. The function is used to define the tolerance for selecting drill tools. The default value for the drill tolerance is 0.10mm. With the function, the drill class must be specified, thus providing a feature for selecting different types of drill holes for output such as plated and/or non-plated drill holes or drill holes defined on blind and buried vias (whichever is assigned with the selected drill class). A dash string input ("-") to the drilling class prompt selects those drill holes for output which are not assigned to any specific drill class. Sieb & MeierThe and functions from the menu are used for generating drilling data and drilling tool table output in Sieb&Meier format. The and functions can be used to specify default names for the Sieb&Meier output files. The function is used to define the tolerance for selecting drill tools. The default value for the drill tolerance is 0.10mm. The tool table file to be generated with the function provides a listing of all drill diameters used for output, with a drill tool number assigned to each drill diameter. Up to 99 different drill diameters can be processed. The output function aborts with the error message if more than 99 different drill diameters are defined on the current layout. With Sieb&Meier format, each drill hole is listed in a single line providing drill coordinates in 1/100mm integer units. With each drill diameter change, the appropriate drill tool number is appended to the end of the corresponding drill data line, thus representing a command for selecting and/or changing the drill tool. With the function, the drill class must be specified, thus providing a feature for selecting different types of drill holes for output such as plated and/or non-plated drill holes or drill holes defined on blind and buried vias (whichever is assigned with the selected drill class). Use the following commands to set the drill tool tolerance to 0.05mm, generate the drill data output file
A dash string input ("-") to the drilling class prompt selects those drill holes for output which are not assigned to any specific drill class. The CAM Processor issues a message after successfully generating the drill data output. With the commands above, a drill tool table file named
/* Drill(Number) Drill Diameter(mm) */
1     0.50
2     0.80
3     0.90
4     1.00
5     1.30
6     3.00
With the commands above, a drill data file named
% X1016Y762T6 X1016Y6350 M30 4.7.14 Insertion DataThe menu provides functions for generating output data for automatic insertion equipment and pick and place machines. The CAM Processor produces insertion data in generic format where all texts placed on a selectable insertion data layer are listed with coordinates (in 1/100mm integer units) and rotation angles (in degree units). It is recommended to define a special documentary layer for insertion data output and to place the
The function from the menu is used to generate insertion data output. After activating the function, the user is prompted for the insertion data layer and the insertion data output file name. Note the option provided with the layer selection menu of the function. This option can be used for writing the insertion data of multiple selectable layers to a single output file. With the option, a popup menu is provided for selecting and/or deselecting insertion data output layers using the left or right mouse button. The button is used to select all currently visible layers for output. Use the following commands to generate insertion data output for the solder side of the currently loaded layout (select documentary layer
-
for output, and direct the output data to a file named
The CAM Processor issues the Insertion data write done! message after successfully generating the insertion data output, and the insertion data file
/* Name X(mm) Y(mm) Angle(Degrees) */

C100          4635    3651      0
C101          3619    3651      0
R104           984    5016    270
CAM Processor |
|||||||||||||||||||||||||||||||||||||||||||||||||||||||||||||||||||||||||||||||||||||||||||||||||||||||||||||||||||||||||||||||||||||||||||||||||||||||||||||||||||||||||||||||||||||||||||||||||||||||||||||||||||||||||||||||||||||||||||||||||||||||||||||||||||||||||||||||||||||||||||||||||||||||||||||||||||||||||||||||||||||||||||||||||||||||||||||||||||||||||||||||||||||||||||||||||||||||||||||||||||||||||||||||||||||||||||||||||||||||||||||||||||||||||||||||
| |||||